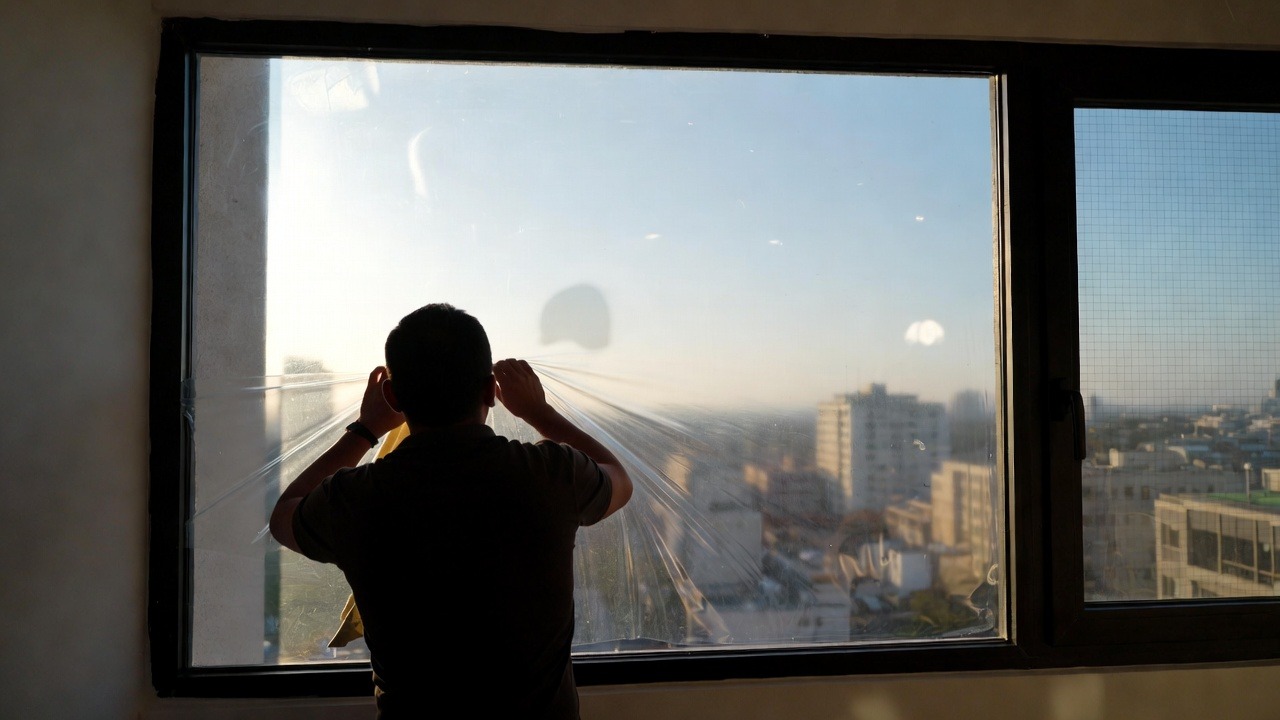
Window films help Toronto and GTA businesses turn plain glass into something more useful. They can add privacy, soften glare, improve comfort, and help a storefront or office look more polished. When window films are combined with vinyl graphics, the same glass can also show your logo, your hours, your suite number, or a simple message that helps people know where to go. That is why more local businesses use window films on doors, partitions, boardrooms, storefronts, and reception areas.
For many owners, the problem starts small. The front glass looks empty. The meeting room feels too exposed. Patients can see too much into a treatment area. Customers walk past the door because the branding is weak. Staff feel like they are working in a fish bowl. These are normal issues in Toronto, from Queen Street West and Leslieville to North York, Vaughan, Markham, Mississauga, and Brampton. A smart mix of window films and vinyl graphics can fix several of those problems at once.
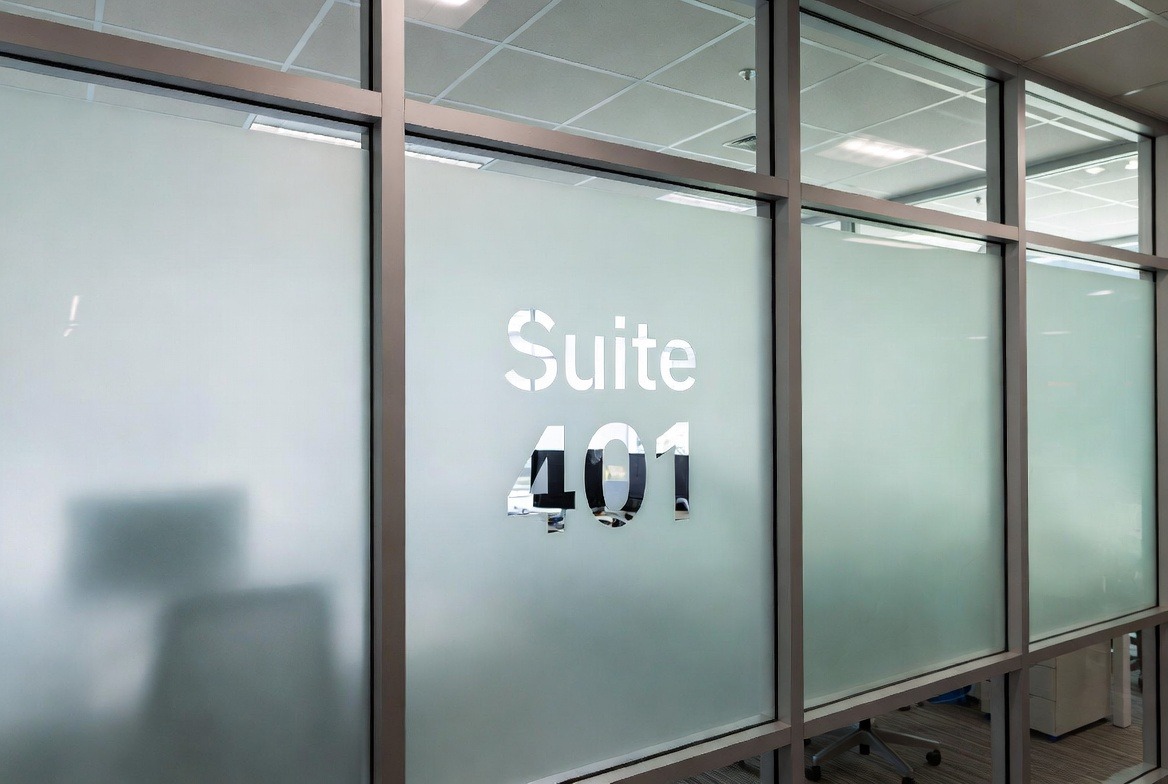
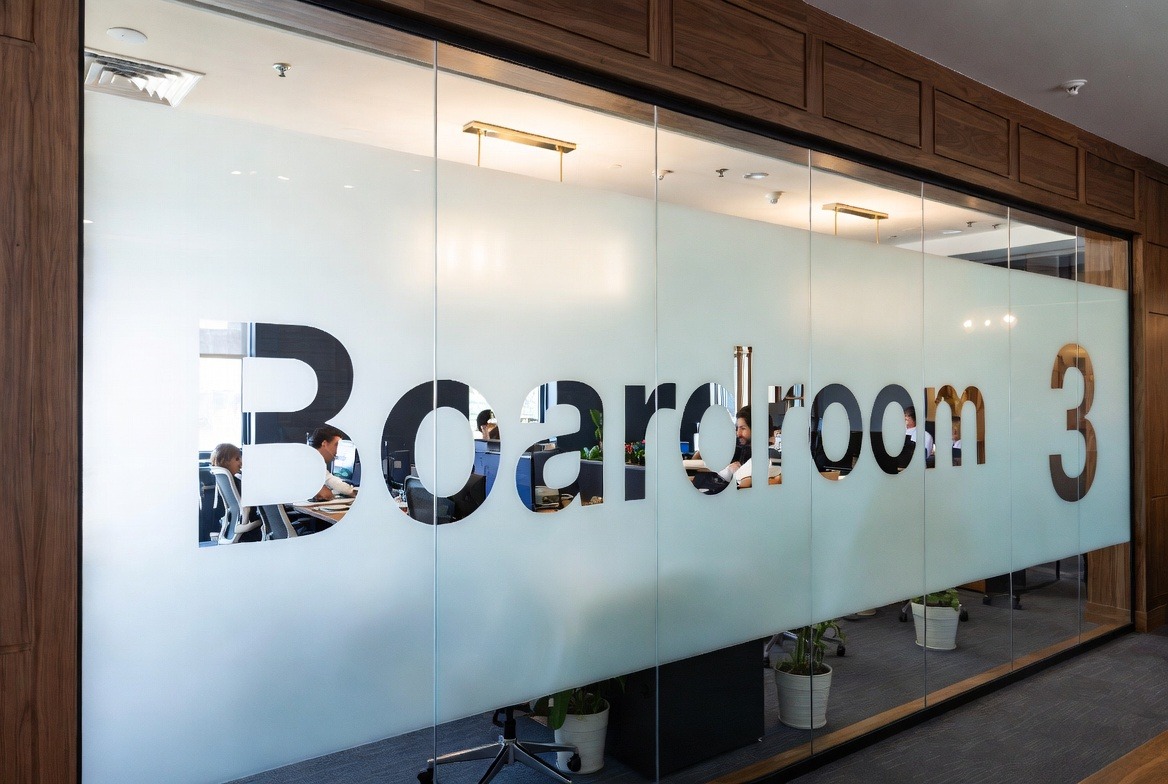
This works because each part has a clear job. The film changes how the glass feels and performs. The graphic changes what the glass says. The film may be frosted, decorative, tinted, or privacy-based. The graphics may be a logo, lettering, arrows, room names, service lists, or store hours. When the layout is planned well, the glass feels clean and calm. When it is rushed, the logo sits too high, the privacy band feels random, and the whole thing looks off. Thats why planning matters.
Many Toronto businesses already use decorative window film to add privacy without making a room feel dark. Pair that with simple vinyl graphics and the same pane can support branding, wayfinding, and a better first impression. The glass does more work, but it still looks simple.
How window films and vinyl graphics work together on real commercial glass
The easiest way to explain it is this. Window films change the surface. Vinyl graphics add meaning. That might sound basic, but it is the reason this combo works so well in offices, clinics, restaurants, salons, gyms, and retail stores across Toronto and the GTA.
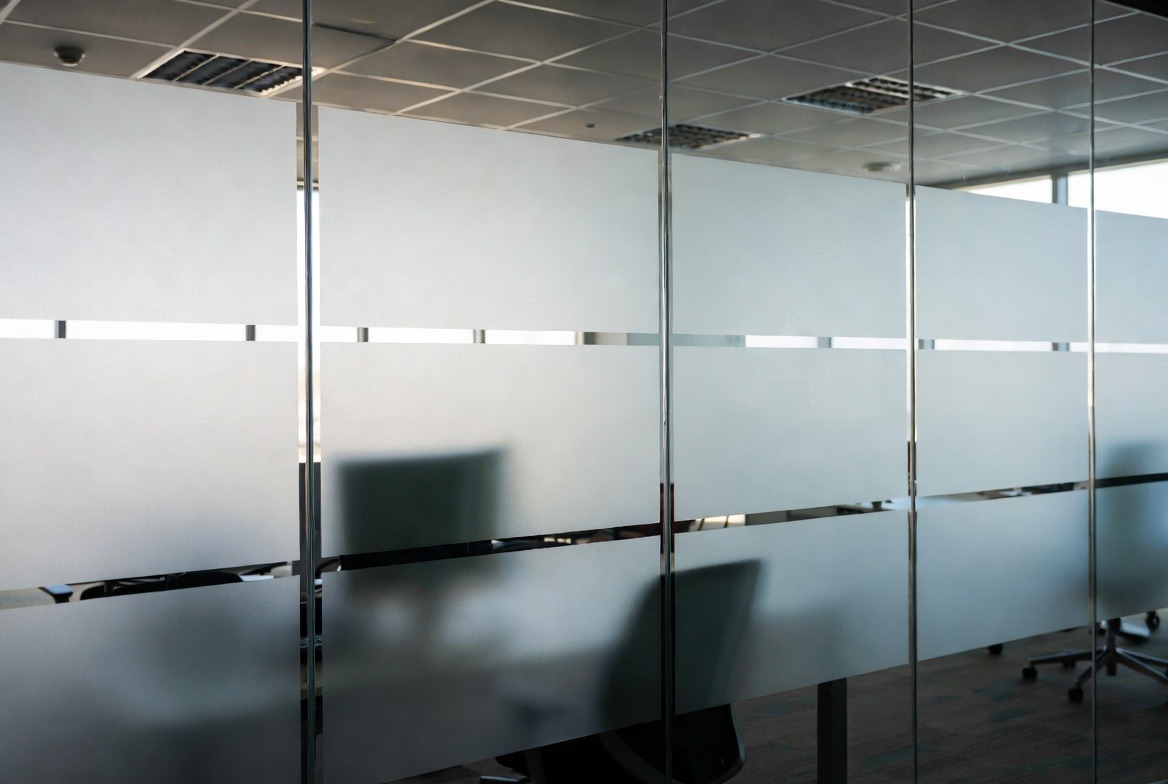
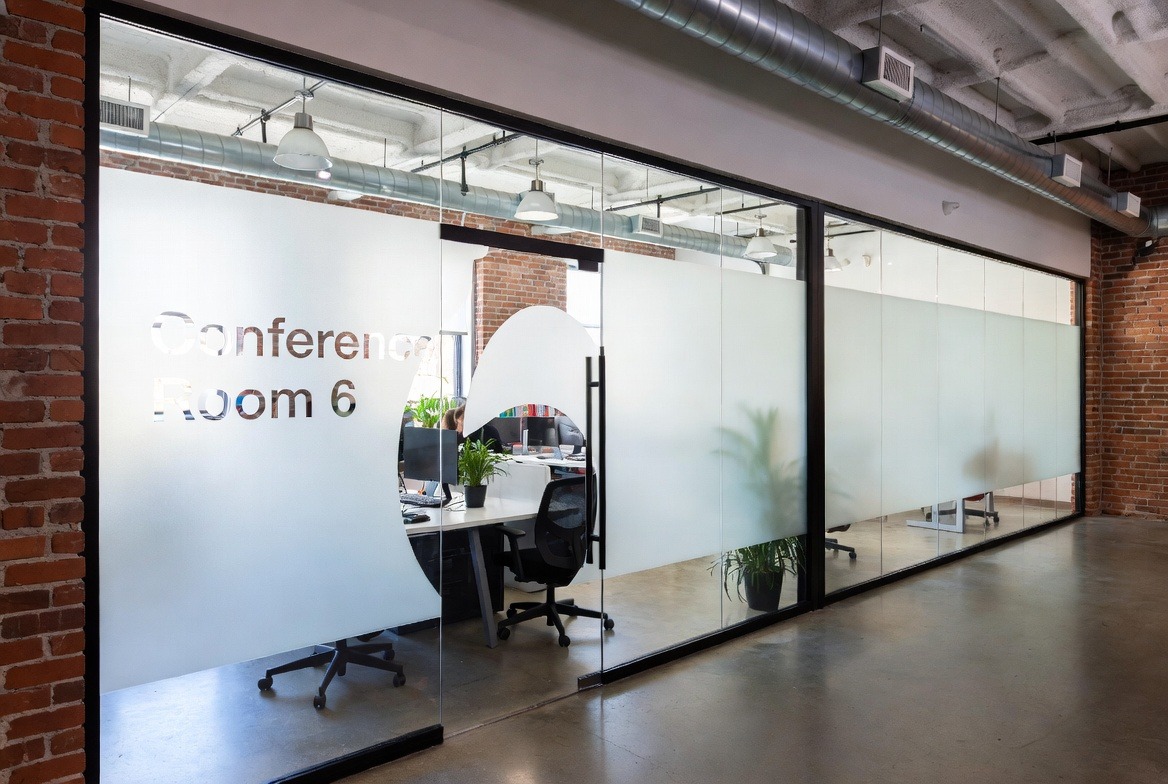
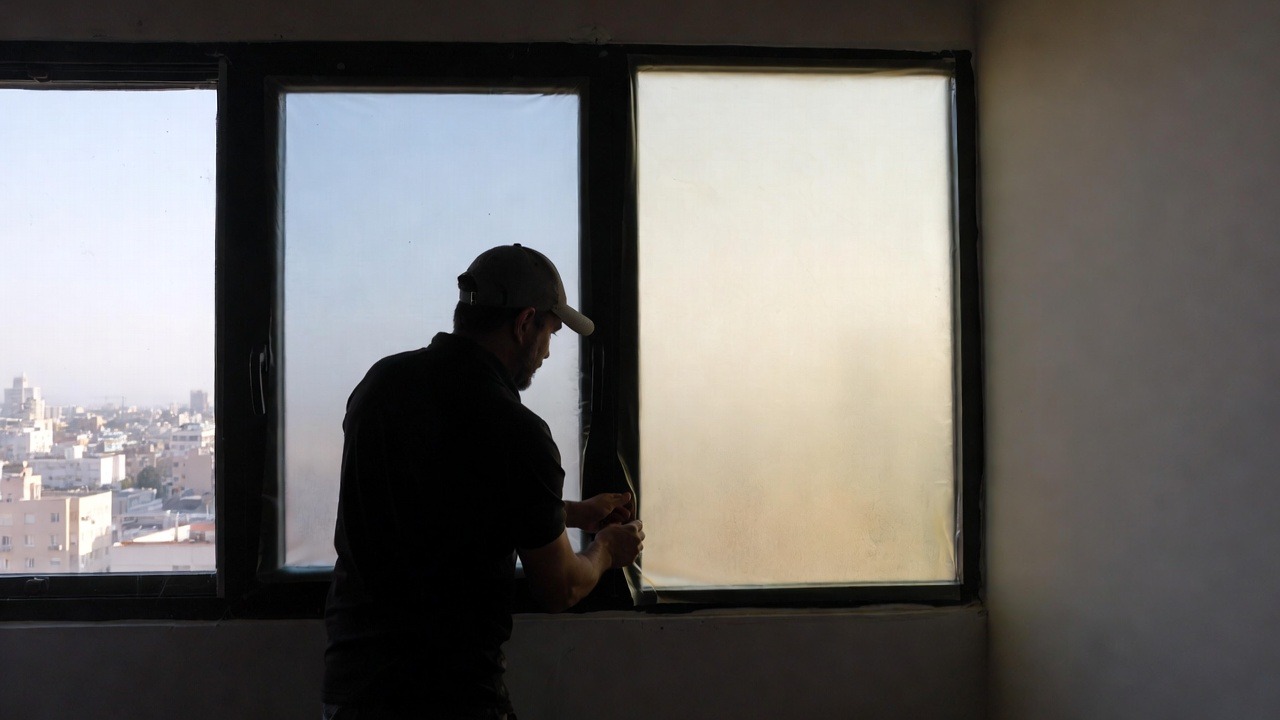
Take a meeting room, for example. Clear glass may look modern for a few days, then people start feeling exposed. Frosted window films across the centre of the pane can fix that. But the room may still need a name, a logo, or a marker on the door. That is where vinyl graphics come in. The film gives privacy. The graphic gives context. Same glass, two jobs.
The same thing happens on storefronts. A front window may need some open area so products or light still show through. It may also need branding that reads fast from the sidewalk. A good layout might leave the upper part open, add a modest privacy band lower down, then place the business name and hours where people naturally stop and read. This is common in busy areas near Yonge Street, the Danforth, Liberty Village, and near larger plazas in Vaughan or Mississauga.
Window films can also help break up big empty panes. Large clear glass often feels cold, harsh, and a bit awkward. Decorative or frosted film gives the glass some structure. Then the logo or lettering can sit in a way that feels balanced. Without that base layer, the graphics can look like they are floating in empty space. With too much film, though, the glass can feel heavy. So the goal is balance, not just coverage.
A proper layout usually looks at four things:
- Privacy for staff, customers, patients, or guests
- Branding so people know who you are right away
- Wayfinding so doors, rooms, and directions are easy to read
- Light so the space still feels open and usable
That is why the combo is not just decorative. It solves real daily problems. It can make a clinic feel calmer. It can make an office look more put together. It can make a storefront easier to notice. It can help staff feel less exposed. It can help customers find the right door without guessing. Those are small wins, but they add up alot over time.
Why Toronto and GTA businesses keep using window films for privacy, branding, and comfort
Toronto has alot of glass. Storefronts, condo lobbies, boardrooms, clinics, fitness studios, salons, cafés, and service offices all use glass to look open and modern. But clear glass creates problems too. People can see too much. Bright light can feel harsh. Plain glass often says nothing about the business behind it. That is why window films keep showing up in commercial spaces across the city and the wider GTA.
Local conditions matter. Toronto has strong summer sun on south and west facing glass, and dark winter evenings when bright indoor lighting makes interiors feel very exposed from outside. Those seasonal shifts change how glass feels in real life. You can see the climate patterns for the area on the Environment and Climate Change Canada climate page. For business owners, the plain version is simple: glass in Toronto often needs help with privacy, visual comfort, or both.
Neighbourhood context matters too. A boutique in Yorkville may want a quieter, more refined look with soft frosting and clean lettering. A Scarborough clinic may care more about patient privacy and clear room labels. A café on Roncesvalles may want branding that reads fast from the street, but still lets people feel cozy inside on a winter evening. An office in Markham may want consistent glass treatment across reception, boardrooms, and side offices. Same materials, diffirent use.
The City of Toronto also keeps public business and local area resources on its business and economy pages, which show how wide the city’s commercial base really is. That matters because business glass is not doing one job anymore. It has to help with image, comfort, privacy, and customer experience all at once.
Case example 1: Downtown clinic. A medical office near College Street had clear treatment room panels and a front entry that felt too bare. Staff wanted patients to feel more private, but they did not want to shut out natural light. The solution used frosted window films across the centre of the room glass, leaving some open space above and below. Then the clinic added simple room labels and a small logo near reception. The result felt calmer right away. It was not a giant reno. It was just smarter use of the glass.
Case example 2: North York service business. A street-level office near Yonge and Sheppard had decent foot traffic, but the front glass was doing almost nothing. People walked by and did not know what the business offered. A revised setup used a modest privacy band near waiting areas, the company name on the main door, and short service text on the sidelight. That gave people more to read in a few seconds and made the office feel more established. Small fix, good effect.
What makes a window films layout look clean instead of cluttered
This is where many projects go wrong. Someone picks a film. Someone emails a logo. Someone says “just centre it.” Then install day comes and the text hits the handle, the frosted band does not line up with the door rail, and the graphic feels too small or too high. Glass is unforgiving. Tiny layout mistakes are easy to spot.
A better approach starts by treating each pane like it has a role. Not every piece of glass should do the same thing. The front door may need branding and hours. A boardroom may need privacy at seated eye level. A side panel may just need a safety marker so people do not walk into it. A reception divider may need a soft decorative treatment with only light text. When every pane gets the same treatment, the result can feel clunky and overdone.
A useful way to plan the glass is by zones:
- Brand zone for logos and business names
- Privacy zone for frosted or decorative window films
- Info zone for room names, suite numbers, or opening hours
- Open zone for daylight and visual relief
This zone method works because it keeps the glass from trying to do too much in one place. It also helps people read the glass more easily. They can see the logo, then the door information, then the room privacy band, without everything competing for attention.
The material mix matters too. Frosted films are common because they are simple and work in many spaces. Decorative films can add more texture or style in salons, design studios, and condo amenities. Clear or lighter privacy films may work better where daylight is a bigger concern. Vinyl graphics can be cut letters, printed logos, icons, or promo pieces. Each option has a place, but the goal is not to use everything. The goal is to use the right amount.
Another thing people miss is viewing angle. The glass may look fine straight on, but odd from the sidewalk or from a waiting chair. A good window films plan checks the glass from inside and outside, standing and seated. It also checks where handles, locks, mullions, and frames interrupt the layout. Those little things are what separate a tidy project from one that looks kindof improvised.
What to ask before hiring someone for window films and vinyl graphics
If you want the glass to look right, ask direct questions early. A good installer should be able to answer them without dancing around.
- Do you install both the film and the graphics, or does another company handle one part?
- Can you show a layout on our actual glass before install?
- How will the design fit around handles, frames, and door rails?
- Which window films finish is best for our goal: frosted, decorative, privacy, or tinted?
- How should staff clean the glass after the work is done?
The cleaning question is a big one. Fresh window films need time to settle. Busy doors get wiped alot. In winter, slush and salt get tracked in from the sidewalk. In restaurants and clinics, staff often clean fast because they are busy. If someone uses rough pads or starts scraping a corner, the film or graphics can wear out faster than they should. Mild cleaner and a soft cloth are usually the safer bet.
A good installer should also ask you questions back. What does each pane need to do? Who sees it first, inside or outside? Where do people stop and read? Which areas need privacy most? How much light do you want to keep? If those questions never come up, the plan may be too shallow, and the result may feel generic.
For Toronto and GTA businesses, one of the best parts of this kind of upgrade is that it uses what is already there. You are not tearing out the frontage. You are making the glass work harder. Good window films paired with the right vinyl graphics can make a business feel more private, more organized, and more readable from the street. That helps offices, clinics, cafés, salons, retail stores, and condo spaces in a pretty practical way.
If your glass feels too open, too empty, or just not very helpful, start there. A simple mix of window films and vinyl graphics can change how people read the whole space before anyone even opens the door. For local business glass, thats a pretty solid upgrade.